Hey everyone! GFC will be discontinued soon for Wordpress Blogs, so be sure to follow with LinkyFollowers instead! I don't want to lose any of you! Thanks!! :D
Welcome to the Crazy Cute Party at Between U & Me! If this is your first time here, make sure to become a follower so you don't miss any of the awesome giveaways, tutorials, before/afters, and so much more! ;D
I am way happy to present to you this week's sponsor! I have a special place in my heart for stationary, cards, invites, and such, so I have had a really hard time deciding which of this awesome shop's listings to show you. I'd like for you to feast your eyes on Paper Fox Designs.
This is a one woman show run by Andrea and she has a huge passion for graphic design and making sure her clients get exactly what they're searching for. Take a look at some of what she has to offer at her shop:
These are customizable Valentine's for your child to hand out to all their friends and they're so unique and fun! How could you pass these up! These are so much better than any store bought box of Valentine's out there!
Simply awesome! Right?!?! Okay, how about something to frame and put in a nursery? Take a look:
Paper Fox Designs is giving one lucky BU&M reader a $25 Credit to use toward anything in the shop!!
Welcome to the Crazy Cute Party at Between U & Me! If this is your first time here, make sure to become a follower so you don't miss any of the awesome giveaways, tutorials, before/afters, and so much more! ;D
This week, I have a super awesome shop to share with you: Turnbow Designs. Paige, over at Turnbow Designs, is a mother and wife and she spends her free time creating everything from bibs and toddler quiet books to infant flip flops and home decor.
You can find so many amazing handmade things over there! You gotta stop by and check it out!
She has these amazing Valentine's inspired decor! How adorable are these!!
You can also find a ton of kid and baby gear and accessories, handmade by this awesome mama!!
--------
Turnbow Desings is giving one lucky BU&M reader a $30 Credit to use toward anything in the shop!!
Welcome to the Crazy Cute Party at Between U & Me! If this is your first time here, make sure to become a follower so you don't miss any of the awesome giveaways, tutorials, before/afters, and so much more! ;D
This week's giveaway is from a shop called Slippery Slope Soaps and they specialize in,... you guessed it,... awesome handmade soaps!
--------
Slippery Slope Soaps is a Mother/Daughter team. Cassandra is the soap and body product engineer, and Merle is the Chandler! We hope you enjoyed visiting our store as much as we enjoy adding to it!
Slippery Slope Soaps is giving one lucky BU&M reader a $25 Gift Certificate and FREE Shipping!
Today, I'm going to do a super easy tutorial on how to make a very awesome centerpiece for your table. Actually, it could really go anywhere,... it's just so purdy. Okay let's get started:
What you'll need:
3 Boxes Candy Canes
1 Glass cylindrical vase
Alotta hot glue
Flowers to put in your vase
Red ribbon
1 Spearmint
1. Wipe off your glass vase. (If yours is anything like mine was, it has dust all over it.)
2. Unwrap your candy canes and carefully position the first one on the vase and determine how tall you would like it. I cut about a 1/4 inch off the bottom of most of mine. Make sure you put each candy can up to the glass before you glue it down, to see if it needs to be trimmed. Candy canes are not identical, like I thought they were. Some are shorter than others.
3. Continue to go around the vase, gluing as you go.
Hi BU&M readers! I hope you had an awesome weekend and I'm happy to see you here today!
Today I want to introduce you to Jenna over at The Newlyweds Blog.
She is the author of an awesome e-cookbook called E-Licious and she is giving away one copy to one lucky BU&M reader! How exciting!!

If you're anything like me, then you have been sorely disappointed when you spend good money on a cookbook and you open the book only to find that you know for a fact you won't be making over half of what's inside. This has happened to me quite frequently actually. Well, this is not going to be the case with
E-Licious. These are REAL recipes that pertain to REAL families and they are all delicious!
Here's what you'll find inside:
- Over 45 delicious recipes with easy to find ingredients.
- 10 sections like :Weeknight Meals, Crock-pot meals, Date Night, Backyard Barbecue and more.
- Recipes like Strawberry Spongecake, Chicken Divan, Shrimp stir-fry and more that your family and friends will love.
- Even more recipes using my most popular recipe Sticky Chicken.
Cooking delicious, yummy meals at home instead of eating out will save you much more than the cost of this book, which is only $4.00 with coupon code: ELICIOUS20. But, not for one of you! One of you will get this e-book for absolutely NOTHING!
Here's how YOU can win!
(one entry for each activity)
- "Like" E-Licious on Facebook and then leave me a comment letting me know you did so. one entry
- Follow The Newlyweds Blog via RSS or email and then leave me a comment here telling me you did so. one entry
- Follow Between U & Me and leave a comment telling me you did so. (If you already are, just leave a comment saying you are.) one entry
This giveaway will end on Sunday at Midnight
If you would like to purchase the book right NOW, head over to
E-Licious and use the following coupon code during checkout and you will receive 20% off the $4.99 price. That's only $4.00 for an awesome cookbook!! Coupon code: ELICIOUS20
Hello everyone!! First off, I want to thank Courtney for inviting me to guest post on her lovely blog!! Such an honor and how fun is this?
Well, I'm Victoria of vixenMade (a.k.a. Vixen) and I've been blogging for almost a year now, which is so crazy now that I think of it! The year flew by! I started blogging because I wanted a way of keeping my projects and crafts in a special place. Plus, I figured why not make tutorials to share with others and, of course, to keep for myself. I love crafting, sewing, diy-ing, and inspiring others so I knew I had to start a craft blog. Besides, you can only stalk other craft blogs for so long!I'm also a SAHM of 3 little ones (4 year old girl and 2 year old twin boys) and a wife. I'm from Canada, too, so a shout out to all you Canadians!! Whoop! Here's a few of my favorite projects/tutorials to check out! Infinity Scarf TutorialFabric Covered Shoe TutorialRuffle Pillow Tutorial
Anyways, today I'm sharing a fun Christmas project with you. It's a perfect gift for a baby or any little person really!
 Here's my tutorial on how to make a Gingerbread Man Rattle. What you need: brown feltscraps of red, green, white feltscraps of red ribbon2 black buttonsblack embroidery threadjingle bellpieces of a plastic bag or packagingpoly-fillsewing supplies
First of all, get yourself a drawing of the outline of a gingerbread man. I sketched one out, but you can find one here to print off. Then cut out your image.
Here's my tutorial on how to make a Gingerbread Man Rattle. What you need: brown feltscraps of red, green, white feltscraps of red ribbon2 black buttonsblack embroidery threadjingle bellpieces of a plastic bag or packagingpoly-fillsewing supplies
First of all, get yourself a drawing of the outline of a gingerbread man. I sketched one out, but you can find one here to print off. Then cut out your image.
 Take a piece of brown felt and fold it in half widthwise.
Pin your image onto the folded piece of felt and cut around the shape so that you'll have two gingerbread man felt shapes.
What you'll need:
8 Jumbo (or large) marshmallows
8 Pops Sticks
Melting Chocolate
8 Red M&M's
16 Candy eyes
16 pretzels
Wax Paper Lined Cookie Sheets
1. Insert stick in to the side of each marshmallow.
2. Lay two pretzels next to each other in the shape of reindeer antlers on the wax paper.
3. Melt the chocolate as directed on the package.
Whew! So, I had a very busy Thanksgiving and Black Friday shopping experience. We hit up Toys R' Us at 7:30pm on Thanksgiving and we went non stop to all the best places for deals including Wal-Mart @ 10pm, Target @ 12am, Kohls @ 1am, KMart @ 5am, Dick's Sporting Goods @ 5:45am, RadioShack @ 6am, OfficeMax @ 6:30 am, and Express @ 9am. It was exhausting, but TOTALLY worth it. Oh! and we scored an awesome deal online on a TV early Thanksgiving morning. It was A-MA-ZING!!
On my Christmas to-buy list this year are some handmade gifts that I'm buying from a couple different shops on Etsy. Here is a round-up of some of the most awesome handmade gifts available on Etsy. So, sit back, relax and maybe cross a couple people off your list by visiting a couple of these really cool shops!
Gifts for Her:
Gifts for Him:
Welcome to Crazy Cute at Between U & Me and HAPPY THANKSGIVING! I am thankful for many things and one of them is having a place here at Between U & Me to unleash my creative side and to have the opportunity to be such wonderful blog friends with all of you! I LOVE my readers and I am thankful to have you here!
If this is your first time here, make sure to become a follower so you don't miss any of the awesome giveaways, tutorials, before/afters, and so much more! ;D
 This week's giveaway is from an awesome shop called ElemenOPillows. The shop owner, Karen, is this fantastically gifted woman who has an eye for the most beautiful fabrics and she creates one of a kind pillows out of these gorgeous fabrics she finds. Here is a little bit about her and her shop:--------ElemenOPillows is my new creation featuring modern, fresh, chic and affordable slipcovers for pillows. A pillow slipcover can be slipped over a pillow you already have or over a pillow form that you purchase from a craft store or online. It's a wonderful way to give a room an instant and inexpensive makeover!
After launching ElemenOPillows on Etsy a few short weeks ago, I have already filled orders for hundreds of pillow slipcovers! The response has been amazing and I am having an absolute blast with it!
The business satisfies my love of fabric, my long-standing love for sewing and decorating and also my entrepreneurial spirit.
--------ElemenOPillows is giving one lucky BU&M reader a $30 gift certificate towards anything in their shop!
Today, I'm going to do a little tutorial on how to make the EASIEST custom jewelry hanger, that you can hang right on your wall. These ones I did in pinks and greens for E's room. These would be perfect as a gift, too! Any girl (little or grown) would love to have some of these to hang all their pretty jewelry on! Let's take a look:
What you'll need:
2 pieces of styrofoam
2 pieces of scrapbook paper
Screw-in hooks
Hot Glue
Sawtooth Hanger
Spray Adhesive
Embellishments
1. Start out by cutting your scrapbook paper to fit your styrofoam. Don't forget to cut strips to cover the sides.
2. Then, using your spray adhesive, adhere the paper to the styrofoam. To make the stick hold even better, spray your surface and then let it sit for 1 minute before you adhere the paper to the styrofoam.
Welcome to Crazy Cute at Between U & Me! If this is your first time here, make sure to become a follower so you don't miss any of the awesome giveaways, tutorials, before/afters, and so much more! ;D
Okay, so I'd like for you to meet this week's sponsor,... MableDear. An amazingly interesting shop that has everything from handmade headbands to vintage housewares to up-cycled barnwood signs.
--------
Hi, I’m Becky from MableDear. Our shop, MableDear, is a family affair. I am the Mom in eastern Washington state and my daughters, Lindsey and Mandy are in Arizona. We love to hunt for treasures, sew and craft. We have been able to combine all these interests in MableDear. Now we can virtually find fun and unique treasures that make us smile and evoke memories of another day. We can virtually share in sewing and crafting unique handmade and upcycled treasures. We love how through Etsy we build relationships with fun people literally all over the world.
--------
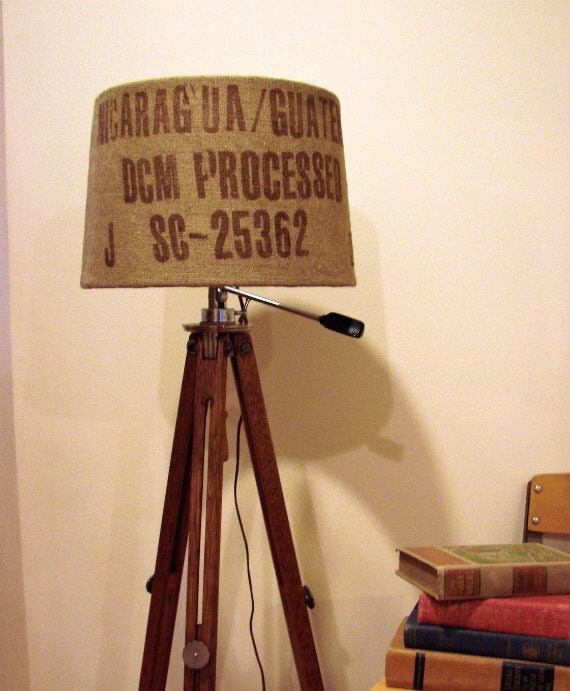
Becky makes these awesome upcycled lamps and lamp shades and collects fun vintage treasures.
Lindsey has 2 (almost 3) kiddos and she is a home decorator, creator of barnwood signs, and hairbows. She also has an amazing blog over at Junk in the Trunk Trio.