
--------
A lot of you have been asking me about the Multi Tabbed Navigation Box you see at the top right of my blog with the About, My Buttons, Sponsor, and Contact tabs on it, so I thought I wold start there. A lot of tutorials out there have you going in to Template > Edit HTML and I am fine with that, but if it's at all possible I'd like not to, and so I found a way to just add a gadget on the sidebar with out having to play with your HTML. Here we go...
* Warning - If you use Internet Explorer, you might get an error message, "Operation Aborted." You will need to preview this gadget before you go live with it. If you do get the error message, then this is not the gadget for you. I'm sorry. :(
Installation:
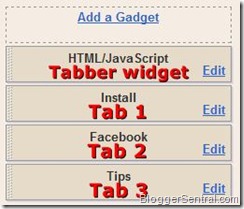
1. Go to Design > Page Elements and click Add A Gadget.
2. Select HTML/Javascript widget.
3. Leave the title box blank.
4. Copy the code below and paste it inside the content box.
Notes:
- The RED is for loading jQuery library. Remove this line if you’ve already loaded it somewhere else in your blog. If you have no idea what jQuery is, then you probably haven't loaded it already and so just leave it.
- The BLUE is where you would specify how many tabs you want.
- The GREEN is where you would change the box background color. The default box background color is white (#fff). To look for color in HTML visit HERE.
5. Place your new HTML/Javascript gadget above the other gadgets that you would like "tabbed."

* Warning - If you use Internet Explorer, you might get an error message, "Operation Aborted." You will need to preview this gadget before you go live with it. If you do get the error message, then this is not the gadget for you. I'm sorry. :(
Installation:
1. Go to Design > Page Elements and click Add A Gadget.
2. Select HTML/Javascript widget.
3. Leave the title box blank.
4. Copy the code below and paste it inside the content box.
<style type="text/css">
.tabber {
 padding: 0px !important;
 border: 0 solid #bbb;
}
.tabber h2 {
 float: left;
 margin: 0 1px 0 0;
 font-size: 12px;
 padding: 3px 5px;
 border: 1px solid #bbb;
 margin-bottom: -1px; /*--Pull tab down 1px--*/
 overflow: hidden;
 position: relative;
 background: #e0e0e0;
 cursor:pointer;
 -moz-border-radius:5px 5px 0 0;
 border-radius:5px 5px 0 0;
}
html .tabber h2.active {
 background: #fff;
 border-bottom: 1px solid #fff; /*--"Connect" active tab to its content--*/
}
.tabber .widget-content {
 border: 1px solid #bbb;
 padding: 10px;
 background: #fff;
 clear:both;
 margin:0;
}
.codewidget, #codeholder {
 display:none;
}
</style>

<script type="text/javascript" src="http://ajax.googleapis.com/ajax/libs/jquery/1.6.0/jquery.min.js"></script>
<script type="text/javascript" src="http://greenlava-code.googlecode.com/svn/trunk/publicscripts/bloggertabs0.1_min.js"></script>
<script type="text/javascript">
$(document).ready(function() {
 $('#codeholder').bloggerTabber ({
  tabCount : 3
 });
});
</script>

<div id='codeholder'><p><a href="http://www.bloggersentral.com/2011/05/create-tabbed-content-blogger-widgets.html" target="_blank">widget</a></p></div>
Notes:
- The RED is for loading jQuery library. Remove this line if you’ve already loaded it somewhere else in your blog. If you have no idea what jQuery is, then you probably haven't loaded it already and so just leave it.
- The BLUE is where you would specify how many tabs you want.
- The GREEN is where you would change the box background color. The default box background color is white (#fff). To look for color in HTML visit HERE.
5. Place your new HTML/Javascript gadget above the other gadgets that you would like "tabbed."
6. Click Save Arrangement and take a look at your blog!
More Notes:
- Make sure that your "tabbed" gadgets have a title.
- If all of your tabs aren't lining up at the top and there are one or two that are on a second row, you're going to need to shorten your "tabbed" gadgets title and/or you need to go to Template > Customize > Adjust Widths and play around with the width of your blog to get all the tabs on the same row.
Enjoy and I hope you're having an awesome day!
I will be using this as soon as I can...thanks so much for giving me a way to make my baby blog look a bit more "big girl"!
ReplyDeleteThank you so much for sharing! I have a question. At the top of your blog you have a place where there are page link, one for HOME, WHERE I LINK, CONTACT, ETC... How do I do that? I so far just have HOME, but I can't seem to figure out how to put more because it's only letting me put one in if I use Blogger's gadget. Can you help me, I would appreciate it! Thank You and your blog looks great!
ReplyDeleteHUGS,
Annamaria
@ Art by ASM - I commented on your blog. Shoot me an email and we'll get that figured out.
ReplyDeletecourtney@betweenunandme.com
Very cool tutorial. Thanks so much for the share!
ReplyDeleteHi Courtney! I'm having lot's of fun with this gadget and I've got it installed on my blog. My question is about your "contact" form - where did you get that? Thanks so much for your tutorial!
ReplyDeleteThis is so cool! I've been wanting something like that for my blog. Thank you so much!!
ReplyDeleteThanks so much for sharing! I need as many blogging tips as I can get. Found you at Its So very Cheri link party.
ReplyDelete-Mackenzie @ www.fridaynightdatenight.blogspot.com
TFS!! Stopping by from Its So Very Cheri linky party and your newest follower.
ReplyDeleteThis is what I shared this week: http://craftybrooklynarmywife.blogspot.com/2011/10/knitting-and-loving-it.html
Thanks for sharing this really helpful tip! I am going to have to play around with it over the weekend.
ReplyDeletehow do you do the TABS?
ReplyDeleteHello! Me again.. just wanted to let you know I've linked this to my "blogging" post today, it's a great tutorial!
ReplyDelete